
Best Accounting Software & Services For Small Business
Read More
Jun 17, 2026
Filed under: Accounting, Bookkeeping, Invoicing
QuickBooks offers six different products for businesses. Learn which version of QuickBooks is right for you.

WRITTEN & RESEARCHED BY
Editor & Senior Staff Writer
Last updated onUpdated

REVIEWED BY
Expert Contributor
All QuickBooks Desktop Pro, Desktop Premiere, Mac, and Desktop Enhanced Payroll products, excluding QuickBooks Desktop Enterprise, will no longer be available to new users after September 30, 2024. Existing QuickBooks Desktop Pro, Premier, Mac, or Enhanced Payroll users will not be impacted. Security updates and product updates will still be released for all users who purchase a QuickBooks Desktop Plus or QuickBooks Desktop Payroll subscription before the cutoff date.
Choosing between QuickBooks products can be intimidating. If you can’t decide if QuickBooks Online, QuickBooks Desktop, or another QuickBooks version is right for your business, this guide is for you.
In this complete QuickBooks Comparison, we’ll explain what each program is capable of, what type of business is best for each version of QuickBooks, and the main differences between each product.
Table of Contents
| Pricing | Business Size | Users | Highlights | |
|---|---|---|---|---|
| QuickBooks Online | $35-$235/month | Small-Medium | 1-25 |
|
| QuickBooks Solopreneur | $20/month | Freelancer | 1 |
|
| QuickBooks Pro Plus | Undisclosed | Small-Medium | 1-3 |
|
| QuickBooks Premier Plus | Undisclosed | Medium | 1-5 |
|
| QuickBooks Enterprise | Starts at $1,481/year | Large | 1-40 |
|
| QuickBooks Mac Plus | Undisclosed | Small-Medium | 1-3 |
|
There are six QuickBooks versions that allow business owners to manage their accounting and finances. Each QuickBooks product varies in price, features, usability, and target audience.
We’ll break down the pros, cons, pricing, and other details for each product to help you make the most informed purchasing decision.
Pros
Cons
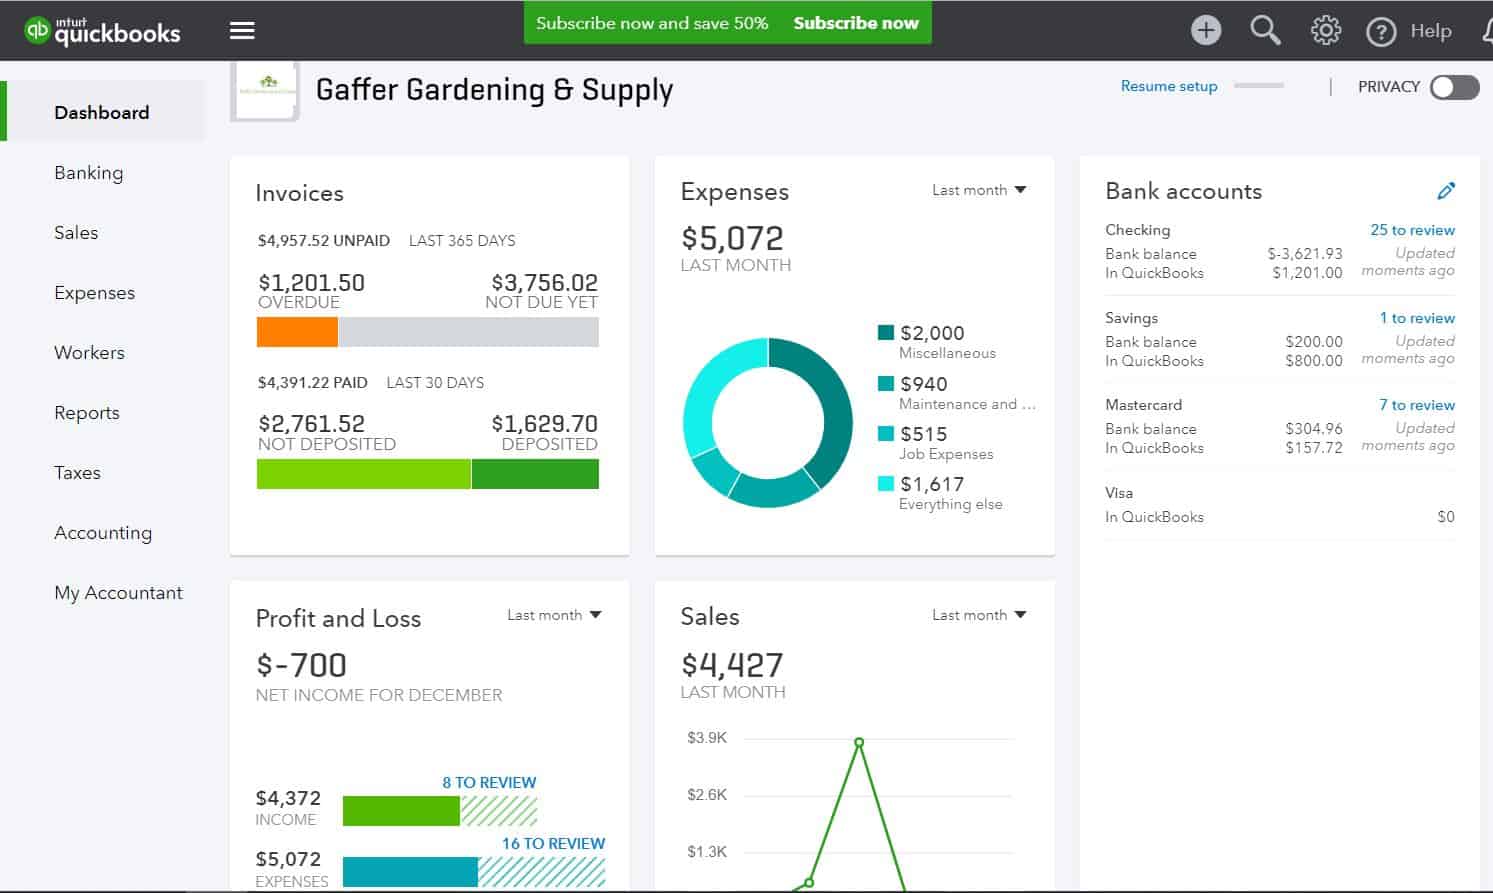
With strong accounting capabilities, impressive features, 750+ integrations, and fully-featured mobile apps, it’s no wonder QuickBooks Online is one of our top accounting recommendations. Though there are occasional navigation difficulties, QBO is incredibly easy to use overall.
The downside of QuickBooks Online is that customer support is a bit lacking, and the subscription fee can be a bit expensive for smaller businesses in need of advanced features.
QuickBooks Online offers an incredible number of features and automations. The software covers all the accounting bases as well as invoicing, expense tracking, accounts payable, contact management, project management, inventory, budgeting, and more.
QuickBooks Online is also the only product on this list that offers a bookkeeping add-on called QuickBooks Live Bookkeeping, where small business owners can receive professional accounting help from a QuickBooks expert.
Prices for QuickBooks Online range from $35-$235/month. Each plan varies in terms of features and the number of users allowed.
QBO offers up to 25 full-fledged users total and an unlimited number of time-tracking-only users.
QBO is best for small businesses looking for easy-to-use, cloud-based accounting software and strong mobile apps.
Pros
Cons
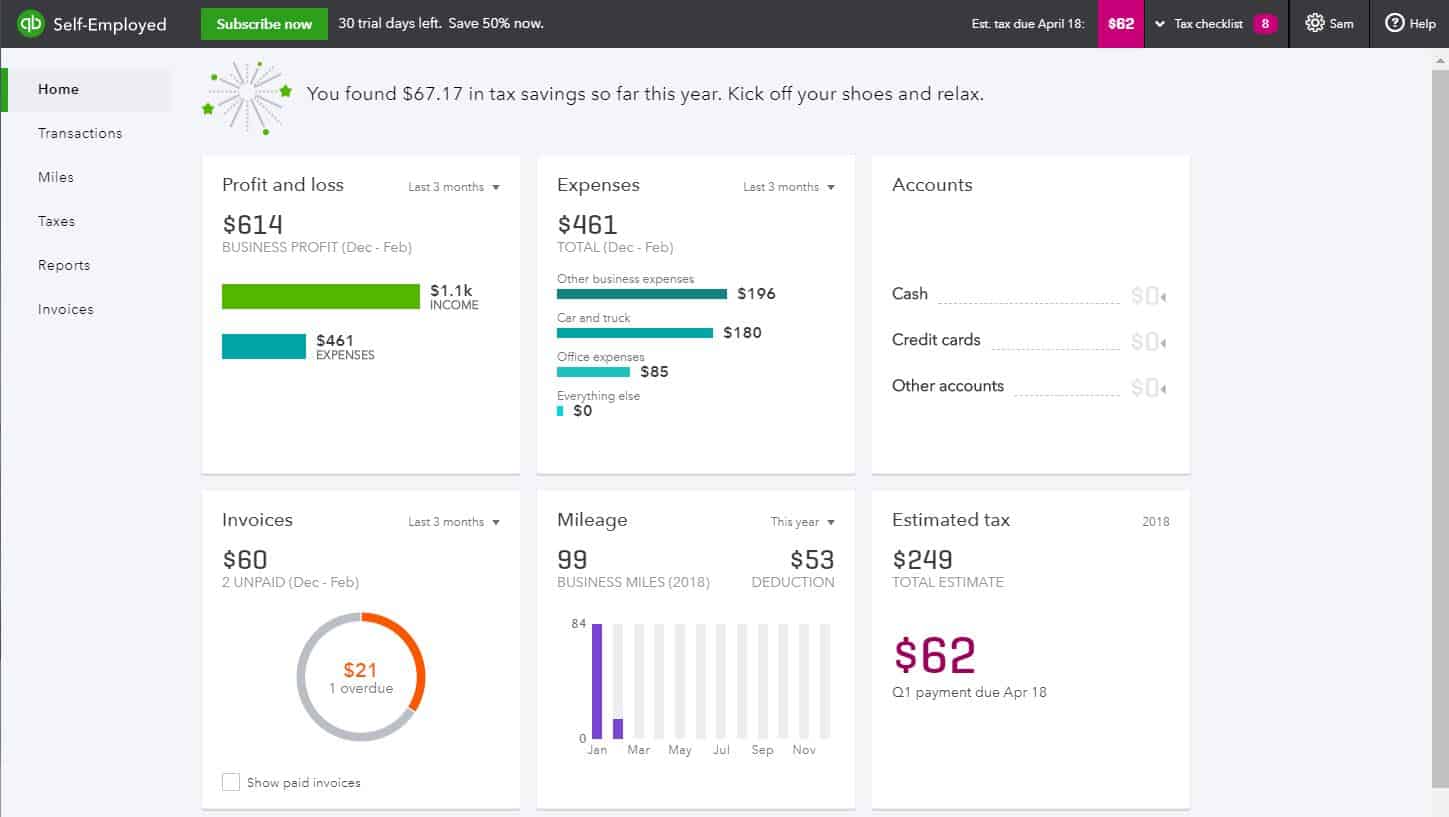
QuickBooks Solopreneur (formerly QuickBooks Self-Employed) isn’t quite accounting software. QuickBooks Self-Employed is tax software created to help freelancers manage their finances.
Quickbooks Solopreneur is an easy-to-use, cloud-based software with strong mobile apps. The Turbo Tax integration is one of the greatest parts of the software, making it easy to file your taxes. Unfortunately, there is no state tax support offered. Limited customer support may also prove to be an issue.
QuickBooks Solopreneur’s features are designed specifically for freelancers to address needs such as estimating quarterly taxes, filing Schedule Cs, and tracking deductions. You can easily separate personal and business expenses, which is ideal for freelancers who don’t have separate business bank accounts.
Not only does Quickbooks Solopreneur help freelancers navigate the scary waters of estimated quarterly taxes, but it also gives them basic bookkeeping tools to track income and expenses.
QuickBooks Solopreneur has one plan that’s priced at $20/month.
QuickBooks Solopreneur is best for freelancers, contractors, and other self-employed individuals in need of basic bookkeeping and tax support.
Pros
Cons
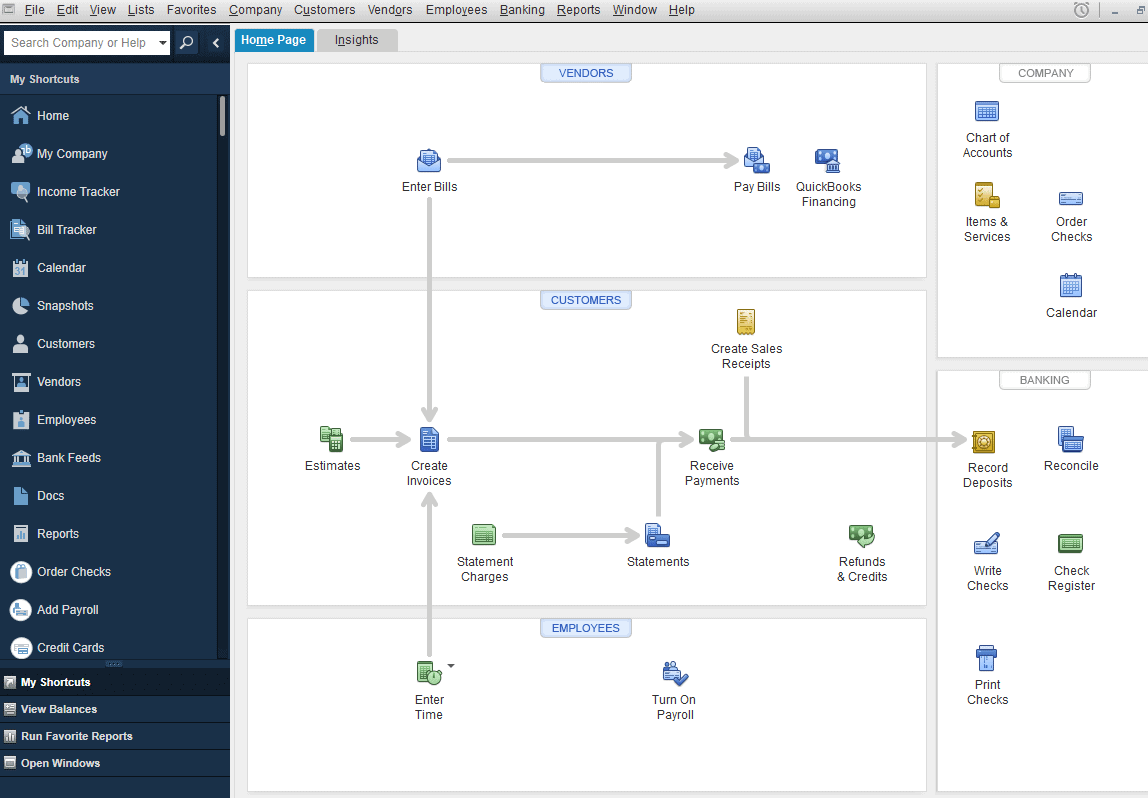
QuickBooks Desktop Pro is the software that put QuickBooks on the map. In terms of accounting, QuickBooks Pro is one of the most developed solutions available, boasting a chart of accounts, journal entries, bank reconciliation, 130+ reports, and more. The software also offers 200+ integrations.
The downside of QuickBooks Pro is that the software comes with a steep learning curve, but for accountants, those with accounting experience, or the business owner who just wants to get their accounting right, taking the time to learn the software can pay off. Customer support could also be improved.
Unfortunately, QuickBooks no longer offers this option for purchase online. To purchase QuickBooks Desktop Pro, you will need to contact QuickBooks Sales by phone. Additional users can be added for an extra fee. Up to three users are supported.
It’s also worth noting again that after September 30, 2024, new sales of QuickBooks Desktop Pro will be discontinued.
QuickBooks Pro is locally-installed software with highly developed features like contact and lead management, expense tracking, project management, accounts payable, invoicing, and more.
QuickBooks Desktop Pro is best for small to medium-sized businesses with three users or fewer looking for strong accounting or locally-installed software.
Pros
Cons
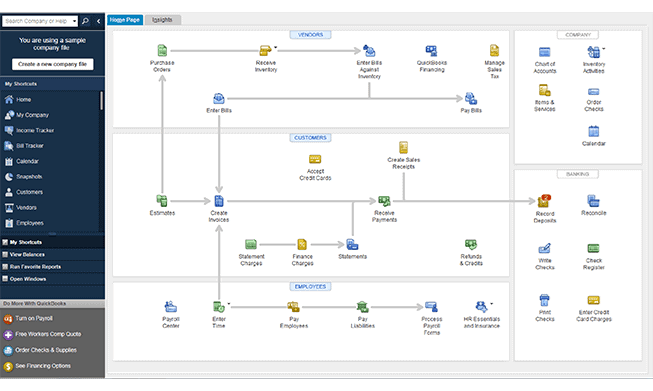
QuickBooks Desktop Premier is the step up from QuickBooks Pro and is best for medium-sized businesses. QuickBooks Premier is robust, locally-installed software with plenty of features and 200+ integrations.
The real thing that sets QuickBooks Premier apart from QuickBooks Online and QuickBooks Pro is the industry-specific features. You also can have one to five users with QuickBooks Premier (instead of QuickBooks Pro’s three-user limit). Similar to QuickBooks Pro, there is a learning curve.
QuickBooks no longer offers pricing details or allows purchases of Premier online. You will have to contact QuickBooks Sales for more information.
As with QuickBooks Pro, Premier will no longer be available for purchase by new users after September 30, 2024.
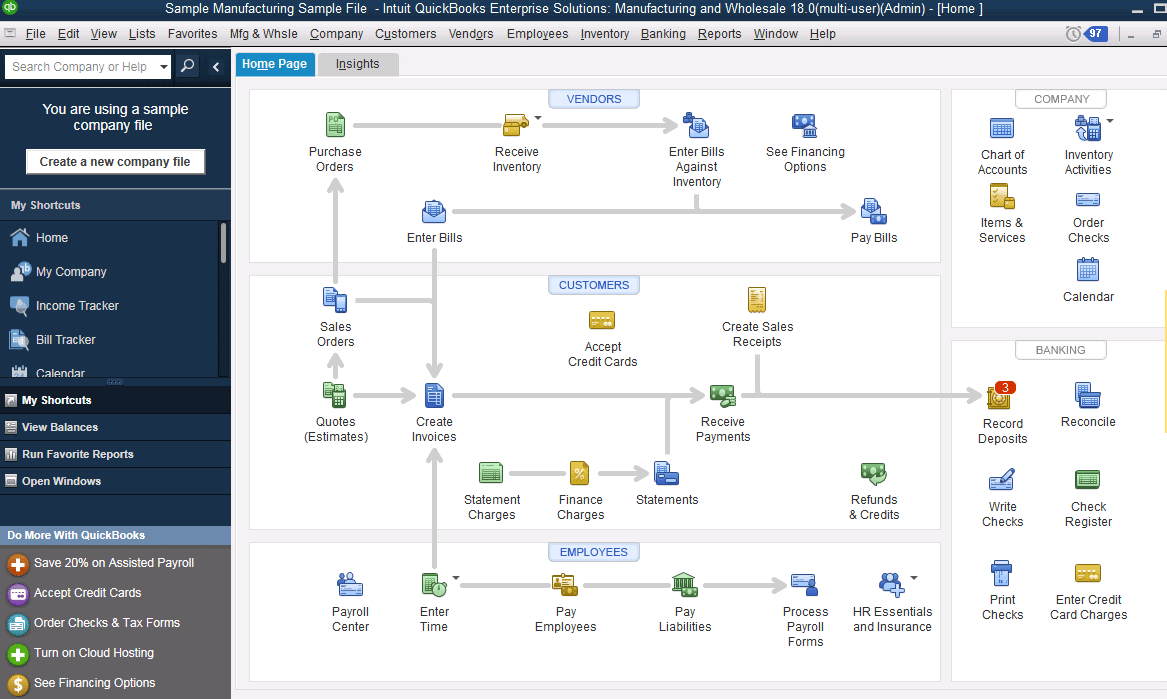
QuickBooks Premier has the features you’d find with QuickBooks Pro. You also have your choice of the standard edition of QuickBooks Premier, or you can choose one of six specialized editions: Contractor, Manufacturing & Wholesale, Nonprofit, Professional Services, Accountant, or Retail. These editions offer advanced features and reporting specific to your business’s industry.
The software includes certain features Pro lacks, including business plans, inventory assemblies, and sales forecasting. However, if you don’t need extra features, the industry editions, or the extra users, QuickBooks Premier could be needlessly expensive.
QuickBooks Premier is best for small to medium business with five users or fewer that need strong accounting and industry-specific accounting features.
Pros
Cons
QuickBooks Desktop Enterprise has the same great accounting capabilities as Pro and Premier but allows access for up to 40 users and much more storage space. QuickBooks Enterprise has highly developed features to meet the needs of nearly any large business. QuickBooks Enterprise also offers much better customer support than QuickBooks Pro or QuickBooks Online with its Priority Circle customer support.
The software is incredibly expensive, and for the price you’re paying, certain features are fairly limited. Apart from being expensive, the other thing with QuickBooks Enterprise is that it really isn’t an enterprise solution — it’s best for large businesses.
QuickBooks Enterprise starts at $1,481/year. Pricing varies based on the number of users and the level of customer support you need, and if you need to add QuickBooks Desktop Payroll.
In terms of features, QuickBooks Enterprise is about as close as you can get to an ERP without making the switch to full-on business management software.
In addition to the strong accounting you’d expect with a QuickBooks desktop product, QuickBooks Enterprise provides invoicing, expense tracking, contact management, project management, job costing, and more.
QuickBooks Enterprise is best for large businesses with up to 40 users looking for advanced accounting software.
Pros
Cons
QuickBooks Mac Plus — also known as QuickBooks for Mac — is locally-installed accounting software designed specifically for Mac users. QuickBooks Mac Plus has the usability of QBO matched with the advanced features and accounting of the other QuickBooks Desktop products. The software supports up to three users, although additional users incur an extra fee.
The main downside of QuickBooks Mac Plus is that the software doesn’t have a single integration. Additionally, QuickBooks Mac Plus never seems to get the same amount of attention as other QuickBooks products in terms of new features and updates.
Like other QuickBooks Desktop products, pricing is no longer disclosed online. You will need to contact Sales to find out more about pricing.
QuickBooks Mac Plus sales will also be discontinued to new users after September 30, 2024.
QuickBooks Mac Plus features invoicing, contact management, expense tracking, inventory, and more.
QuickBooks Mac Plus is best for small to medium-sized businesses looking for locally-installed software compatible with Macs.
Each QuickBooks product varies based on price, features, and usability. QuickBooks Online is easier to use than the desktop versions, but QuickBooks Desktop Pro, Premier, and Enterprise have stronger features and accounting. This QuickBooks comparison explains the differences between each version.
This table takes a deep look into each program’s features, so you’ll know exactly what each version of QuickBooks is capable of. Comparing QuickBooks features is one of the best ways to decide which version of the software is the best fit for your business.
| Features | QuickBooks Online | QuickBooks Solopreneur | QuickBooks Pro Plus | QuickBooks Premier Plus | QuickBooks Enterprise | QuickBooks Mac Plus |
|---|---|---|---|---|---|---|
| Number Of Integrations | 750 | 6 | 244 | 241 | 247 | 0 |
| Invoicing | ✔ | ✔ | ✔ | ✔ | ✔ | ✔ |
| Number of Invoice Templates | 6 | 1 | 4 | 8 | 10 | 31 |
| Customizable Templates | ✔ | ✔ | ✔ | ✔ | ✔ | |
| Multilingual Invoicing | ✔ | |||||
| Recurring Invoices | ✔ | ✔ | ✔ | |||
| Autoschedule Invoices | ✔ | |||||
| Batch Invoices | ✔ | ✔ | ✔ | ✔ | ✔ | |
| Automatic Invoice Reminders | ✔ | ✔ | ✔ | ✔ | ✔ | |
| Invoice Discounts | ✔ | ✔ | ✔ | ✔ | ✔ | |
| Online Invoice Payments | ✔ | ✔ | ✔ | ✔ | ✔ | ✔ |
| Estimates | ✔ | ✔ | ✔ | ✔ | ✔ | |
| Packing Slips | ✔ | ✔ | ✔ | ✔ | ✔ | |
| Purchase Orders | ✔ | ✔ | ✔ | ✔ | ✔ | |
| Sales Orders | ✔ | ✔ | ✔ | |||
| Sales Receipts | ✔ | ✔ | ✔ | ✔ | ✔ | ✔ |
| Contact Management | ✔ | ✔ | ✔ | ✔ | ✔ | |
| Lead Management | ✔ | ✔ | ✔ | |||
| Customer Credit Memos | ✔ | ✔ | ✔ | ✔ | ✔ | ✔ |
| Customer Refunds | ✔ | ✔ | ✔ | ✔ | ✔ | ✔ |
| Expense Tracking | ✔ | ✔ | ✔ | ✔ | ✔ | ✔ |
| Manage Personal Expenses | ✔ | |||||
| Live Bank Feeds | ✔ | ✔ | ✔ | ✔ | ✔ | |
| Manual Bank Statement Importing | ✔ | ✔ | ✔ | ✔ | ✔ | |
| Bank Reconciliation | ✔ | ✔ | ✔ | ✔ | ✔ | |
| Chart Of Accounts | ✔ | ✔ | ✔ | ✔ | ✔ | |
| Journal Entries | ✔ | ✔ | ✔ | ✔ | ✔ | |
| Accounts Payable | ✔ | ✔ | ✔ | ✔ | ✔ | |
| Recurring Bills | ✔ | ✔ | ✔ | ✔ | ||
| Project Management | ✔ | ✔ | ✔ | ✔ | ✔ | |
| Task Management | ✔ | ✔ | ✔ | |||
| Job Costing | ✔ | ✔ | ✔ | ✔ | ✔ | |
| Time Tracking | ✔ | ✔ | ✔ | ✔ | ✔ | |
| Built-In Timer | ✔ | ✔ | ✔ | |||
| Bill Time to Customers as Invoices | ✔ | ✔ | ✔ | ✔ | ✔ | |
| Inventory | ✔ | ✔ | ✔ | ✔ | ✔ | |
| Low Stock Reminders | ✔ | ✔ | ✔ | ✔ | ✔ | |
| Inventory Bundles | ✔ | ✔ | ||||
| Number of Reports | 80 | 5 | 130 | 135 | 200 | 110 |
| Budgeting | ✔ | ✔ | ✔ | ✔ | ✔ | |
| Business Plan Creator | ✔ | |||||
| Class Tracking | ✔ | ✔ | ✔ | ✔ | ✔ | |
| Letter Templates | ✔ | ✔ | ✔ | |||
| Calendar & To-Do Lists | ✔ | ✔ | ✔ | ✔ | ||
| Mileage Tracking | ✔ | ✔ | ✔ | ✔ | ✔ | ✔ |
| Home Office Deduction | ✔ | |||||
| Tax Checklist | ✔ | |||||
| 1096 Forms | ✔ | ✔ | ✔ | ✔ | ||
| 1099 Forms | ✔ | ✔ | ✔ | ✔ | ✔ | |
| W-2 Forms | ✔ | ✔ | ✔ | ✔ | ||
| W-3 Forms | ✔ | ✔ | ✔ | |||
| Schedule C’s | ✔ | |||||
| E-Filing | ✔ | ✔ | ✔ | ✔ | ✔ | ✔ |
| Sales Tax | ✔ | ✔ | ✔ | ✔ | ✔ | |
| Multicurrency Support | ✔ | ✔ | ✔ | ✔ | ✔ | |
| Upload & Save Documents | ✔ | ✔ | ✔ | |||
| Access To Lending | ✔ | ✔ | ✔ | ✔ | ||
| Professional Bookkeeping Support | ✔ |
Note: Features may vary by plan.
If you can’t decide between two programs, here’s how they stack up head-to-head to help you determine which version of QuickBooks is the best accounting solution for your business.
QuickBooks Online is cloud-based software, so it offers more mobility. But what QuickBooks Pro Plus sacrifices in mobility, it more than makes up for in its features, which are more developed than what you’ll find in QuickBooks Online.
However, QuickBooks Pro’s features do come at a price, as this software has a steep learning curve. If you’re new to accounting software, it’s important that you have the time to commit to learning the software. If not, QuickBooks Online is much more user-friendly, even for accounting newbies.
Another big difference to note is the number of supported users. QuickBooks Pro only supports up to three users, and you have to pay per user. QuickBooks Online supports up to 25 users based on the plan you select. Learn more about the differences between QuickBooks Online vs. QuickBooks Pro.
QuickBooks Solopreneur is designed with the freelancer in mind. Businesses with multiple users or that need more advanced features won’t find what they’re looking for here. QuickBooks Solopreneur is more tax software than accounting software, lacking many of the features you’d find with full-fledged cloud-based accounting software like QuickBooks Online.
However, freelancers that need good tax support and don’t require the more advanced features found in QBO may find everything they need with QuickBooks Self-Solopreneur.
QuickBooks Solopreneur offers basic features at a cost-effective price. Businesses that require multiple users or want more accounting features will benefit more from using QuickBooks Online.
On the surface, QuickBooks Pro and QuickBooks Premier are very similar. Both are locally-installed accounting solutions, both offer numerous features and robust reporting, and both have numerous integrations.
However, the primary difference between the two lies in QuickBooks Premier’s industry-specific editions. Users in specific industries can access unique features and industry-specific reporting. Additionally, QuickBooks Premier supports up to five users, whereas QuickBooks Pro only supports a maximum of three.
However, businesses with three or fewer users that plan to use only the standard version of QuickBooks Premier are better off saving their time (and money!) by signing up for QuickBooks Pro.
QuickBooks Premier is suitable for small to medium businesses with five or fewer users. On the other hand, QuickBooks Enterprise is designed for larger businesses that want access to more users and more features without fully upgrading to ERP software.
QuickBooks Enterprise supports up to 40 users, compared to Premier’s maximum of five. QuickBooks Enterprise also has a number of other useful features and tools you won’t find with Premier, such as a business plan creator.
Mac users that want a locally-installed accounting solution will find that QuickBooks Mac Plus offers a pretty good set of features and is optimized for use on Mac. QuickBooks Mac Plus is set up in a similar way to QuickBooks Pro or Premier but is easy to use, much like QuickBooks Online, offering users the best of both worlds.
However, QuickBooks Mac Plus does noticeably lack some of the features available on QuickBooks Online, including recurring invoices and live bank feeds. QuickBooks Mac Plus also has no integrations, whereas QBO has more than 750.
If you read the overview of each QuickBooks product, you may already have an idea of which version of QuickBooks is best for your small business. If not, don’t worry. These five questions will help you narrow down your search and find what you’re looking for.
While the numerous options seem intimidating at first, each version of QuickBooks is designed to reach a certain business size and type.
QuickBooks Online and QuickBooks Solopreneur are the best for businesses wanting cloud-based software with mobile apps. QuickBooks Solopreneur is specifically for freelancers, while QuickBooks Online is a good fit for nearly any size business.
QuickBooks Pro, Premier, Enterprise, and Mac are the best for users with existing accounting experience or who want a locally-installed option. The main differences between the versions are your computer’s operating system and your business’s size.
If a specific version of QuickBooks stood out to you, we recommend taking the software for a test run to make sure you love using it.
If, after reading this post, you aren’t convinced that any version of QuickBooks is right for you, or if you just want to consider all of your options, there are other solutions that may be a better fit. Check out our picks for the best accounting software for small businesses.

Need A Simple Accounting Solution?
FreshBooks |
|---|
This easy-to-use and feature-rich software is ideal if you have no bookkeeping experience and want top-notch customer support. Get Started.
Need A Simple Accounting Solution?
FreshBooks |
|---|
This easy-to-use and feature-rich software is ideal if you have no bookkeeping experience and want top-notch customer support. Get Started.

Want to help shape the future of the Merchant Maverick website? Join our testing and survey community!
By providing feedback on how we can improve, you can earn gift cards and get early access to new features.
Help us to improve by providing some feedback on your experience today.
The vendors that appear on this list were chosen by subject matter experts on the basis of product quality, wide usage and availability, and positive reputation.
Merchant Maverick’s ratings are editorial in nature, and are not aggregated from user reviews. Each staff reviewer at Merchant Maverick is a subject matter expert with experience researching, testing, and evaluating small business software and services. The rating of this company or service is based on the author’s expert opinion and analysis of the product, and assessed and seconded by another subject matter expert on staff before publication. Merchant Maverick’s ratings are not influenced by affiliate partnerships.
Our unbiased reviews and content are supported in part by affiliate partnerships, and we adhere to strict guidelines to preserve editorial integrity. The editorial content on this page is not provided by any of the companies mentioned and has not been reviewed, approved or otherwise endorsed by any of these entities. Opinions expressed here are author’s alone.