QuickBooks Desktop Pro may be one of the most popular accounting solutions out there, but it’s not always the most intuitive.
This QuickBooks 101 guide will walk you through everything you need to know. From setting up your account to adding contacts to sending your first invoice, we are here to help every step of the way.
Install QuickBooks Pro On Your Computer
If you haven’t done so yet, you’ll need to purchase a QuickBooks Pro license.
After purchasing your license, you’ll have to download QuickBooks Pro onto your computer. Before you do this, look at the QuickBooks Pro hardware requirements to ensure your computer makes the grade.
Step 1: Begin The Download
If you purchased your QuickBooks Pro license directly from Intuit, you’ll be provided a license number and product number. You’ll need to have these numbers handy to create your account.
Once you have these numbers, go to your order confirmation and click on the “Start using Quickbooks Pro now” button to install QuickBooks Pro onto your computer. Make sure you’ve selected the correct version of QuickBooks Pro before beginning the download.
If you purchased your license in a store (such as Staples), you’ll find the license and product number on the back of your QuickBooks Pro box. Once you have these numbers, open the package and insert the disc into your computer to begin the download. After this point, the installation and setup processes are the same, no matter how you purchased the software.
Note: The download will take quite some time.
Step 2: Accept The License Agreement
Once the download is complete, you’ll be taken to a screen that looks like this:

Click “Next”; then accept the QuickBooks Pro License Agreement.
Step 3: Enter Your License & Product Numbers
Next, enter the license and product numbers we mentioned earlier.

Step 4: Select Your Setup Process
Finally, select your setup process. Choose either “Express” or “Custom and Network Options.”

QuickBooks Pro recommends Express, which is what we chose for our sample company, but you can click the question mark icon in the bottom left-hand corner of the screen to learn which method is right for you.
Once you’ve selected the proper setup option, QuickBooks Pro will finish installing.
Create Your QuickBooks Pro Account
Once you’ve installed the software, you can begin creating your QuickBooks Pro account.
Step 1: Create Your Company File

You can choose to create the file for yourself or on behalf of someone else. You can also select the “Other Options” drop-down menu to open or convert existing data. Refer to QuickBooks’ Getting Started Guide to learn how to convert software files.
Step 2: Add Your Business Name
Type in your company’s name.

Step 3: Select Your Industry
Select your company’s industry. Click the “Help me choose” link for a drop-down menu of choices.

Step 4: Select Your Business Type
Choose the appropriate business type from the drop-down menu. You should already know this, but you can utilize the “Help me choose” link for additional help.

Step 5: Add Your EIN
Type in your Employee Identification Number. Click on the question mark icon for additional information about this step.

Step 6: Enter Your Business Address
Add your business address, including city, state, zip code, and country.

Step 7: Add Your Company Phone Number
Finally, add your company phone number.

Once all of this information has been filled in, click the “Create Company” button in the bottom right-hand corner. You’ll know your company file was successfully created because you’ll be taken to a screen that looks like this:

Get Acquainted With QuickBooks Pro’s Organization
When you first open QuickBooks Pro, it can be a little overwhelming. In this section, we’ll break down the basic organization so that you can be navigating the software in no time.
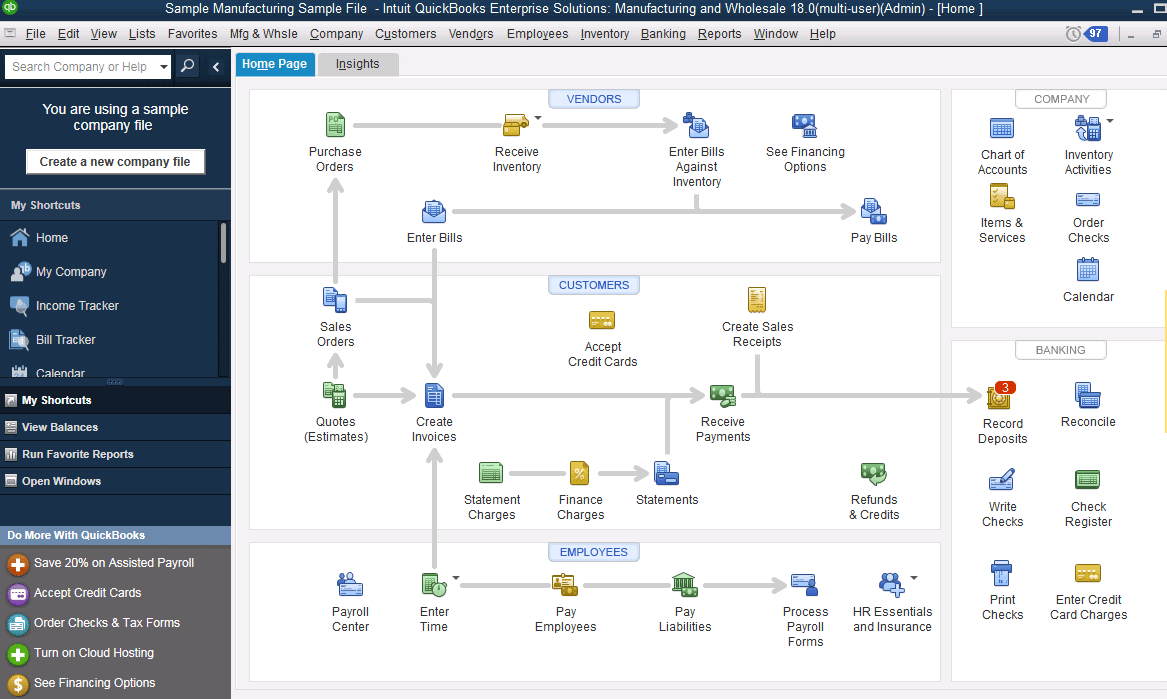
QuickBooks Pro Home Screen

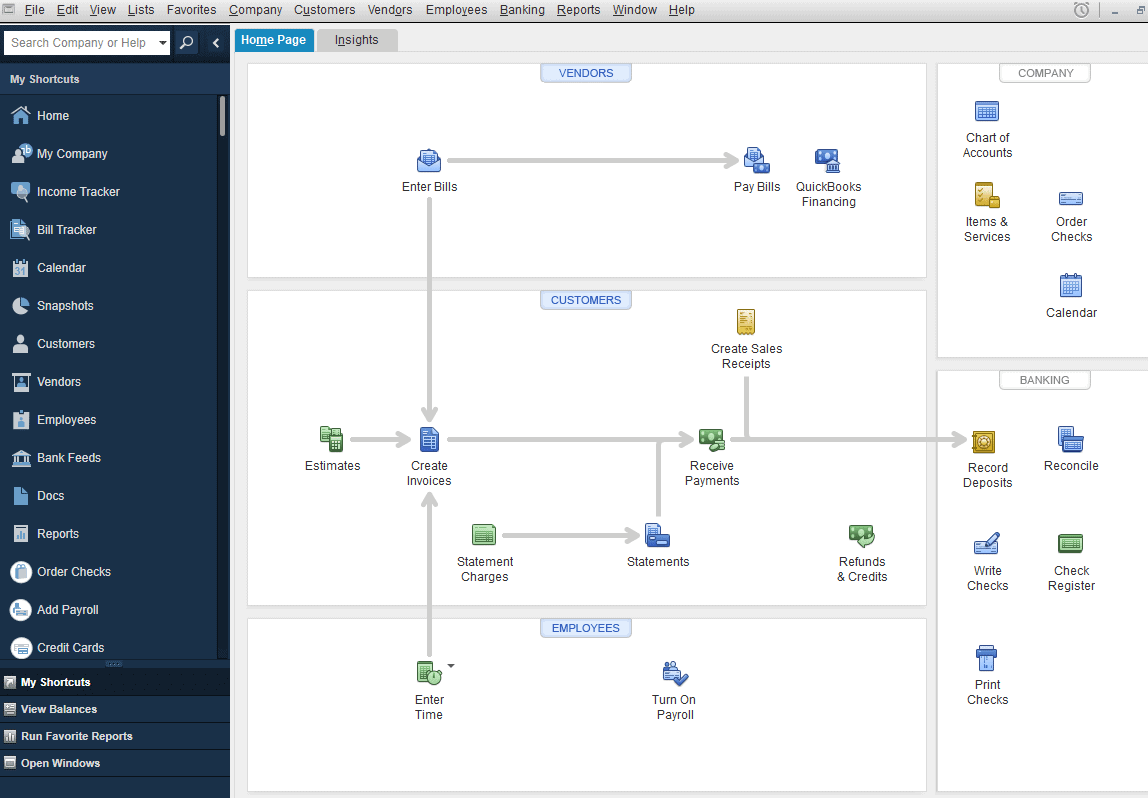
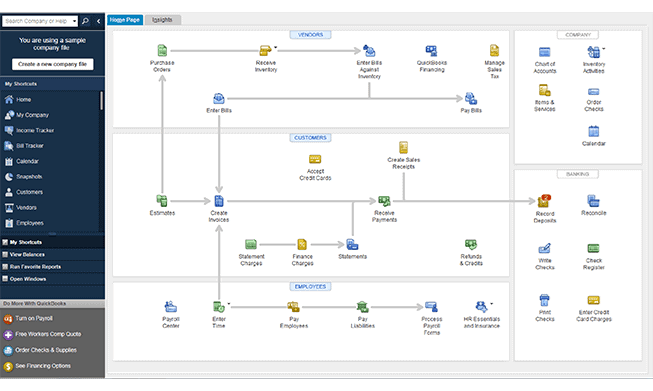
When I saw the Home page initially, it looked like a bunch of random icons. There is a method to the madness, however. Each icon represents a key feature in QuickBooks Pro. These icons are sorted into five sections:
- Vendors
- Customers
- Employees
- Company
- Banking
In addition to the Home screen, there is a menu on the left-hand side of the screen that reads Home, My Company, Income Tracker, Bill Tracker, Calendar, Snapshots, Customers Vendors, Employees, Bank Feeds, Docs Reports, Order Checks, Add Payroll, Credit Cards, Services, User Licenses, and Feedback.

These menu options (or ‘shortcuts,’ as QuickBooks calls them) are completely customizable. Clicking one of these shortcuts will take you straight to the correlating feature.
Underneath, you’ll see My Shortcuts, View Balances, Run Favorite Reports, and Open Windows.
QuickBooks Pro Quick Access Toolbar
While both the Home screen and shortcut menu will take you to features in QuickBooks Pro, the area you’ll want to familiarize yourself with the most is the Quick Access Toolbar at the top of the screen. The toolbar reads File, Edit, View, Lists, Favorites, Company, Customers, Vendors, Employees, Banking, Reports, Window, and Help.

You’ll use this toolbar much like you would use the toolbar in Microsoft Word or Google Docs. Each toolbar tab takes you to a drop-down menu with a comprehensive list of features associated with that tab.

I know it’s a lot to take in, but don’t worry. There is a handy search bar in the top left-hand corner that you can use to find your way around.
Edit Preferences
The Preferences section is QuickBooks Pro’s version of Settings. You’ll want to spend a serious chunk of your time filtering through settings and editing the hundreds of preferences options in QuickBooks Pro.

The preferences you should choose will vary significantly from company to company, so we won’t walk you through each step this time, but we can give you an idea of some of the settings you can change in your company preferences:
- Accept multiple currencies
- Enable the inventory feature
- Enable the time-tracking feature
- Add integrations
- Accept online payments
- Edit bill defaults
- Set automatic invoice reminders
- Add sales tax
- Choose a default shipping method
- Turn on 1099 filing
Be sure to always click the blue “Okay” button in the top right-hand corner of your screen to save your preferences. You can access Preferences by going to Edit > Preferences, then selecting the category you want to edit from the menu on the left-hand side of the screen.
Add Your Company Information
Once you’ve edited your preferences, you’ll need to add some critical company data before you start using the software.
- Your contacts
- Your vendors
- Your items (or services)
- Your employees
You can add this information manually or import existing files into QuickBooks Pro directly.
Create Your Chart Of Accounts
There are two ways to create your set up your chart of accounts in QuickBooks Pro. You can either export an existing chart of accounts or create a brand new chart of accounts.
If you have an existing chart of accounts, you can import it by going to Lists>Chart of Accounts>Accounts>Import from Excel.
If you are creating a chart of accounts for the first time, don’t worry. QuickBooks Pro has got you covered. Remember way back when you were setting up your account and had to select an industry type?
QuickBooks Pro uses this industry to create a default chart of accounts for your company. For our sample construction company, the default chart looks like this:

Now, this doesn’t mean your job is done. You’ll need to delete unnecessary accounts, edit existing accounts, and add accounts that aren’t present.
You’ll find options to delete, edit, or add accounts under List>Chart of Accounts>Accounts.
Connect To Your Bank Accounts
In QuickBooks Pro, you can manually import your banking information instead of opting for live bank feeds, but live bank feeds make things easier for your business.
To connect to your bank account, go to Banking>Bank Feeds>Set up bank Feed for an Account.
Step 1: Select Your Bank
Find your banking provider.

Step 2: Log Into Your Bank Account
Next, you’ll be asked to log in to your account using your banking username and password.

Step 3: Link To Your Bank
Each bank handles this process a little differently, so follow the directions on your screen for instructions.
How To Set Up Sales Tax In QuickBooks Pro
In QuickBooks Pro, there are two different ways of creating sales tax rates within the software: sales tax items and sales tax groups.
A sales tax item is a single tax rate; a sales tax group is a collection of individual sales tax rates that are added together to create a single rate. Here’s how to use both methods for creating sales tax rates.
How To Add A Sales Tax Item In QuickBooks Pro
To begin adding a sales tax item, go to Edit>Preferences>Sales Tax>Company Preferences.
Step 1: Enable Sales Tax
Before you can add a Sales Tax Item, you’ll need to make sure your company is set up to collect sales tax.
QuickBooks Pro will ask you the question, “Do you charge sales tax?” Make sure “Yes” is selected.
Step 2: Add A New Sales Tax Item
Click the “Add sales tax item…” box.

You’ll be taken to a screen that looks like this:

Make sure the “Sales Tax Item” is checked.
Step 3: Create A Sales Tax Name
Create a name for you Sales Tax Item.

Step 4: Write A Sales Tax Description
Customize your sales tax description.

Step 5: Add A Tax Rate
Add the appropriate sales tax percentage rate.

Step 6: Select The Tax Agency
Use the drop-down menu to select the appropriate sales tax agency. The sales tax agency is the legal entity for which you collect sales tax. If you need help finding the right sales tax agency, refer to our Small Business Sales Tax Guide.

You most likely will need to create a brand new vendor for your tax agency. You can do so by clicking “<Add New>.” Then, fill in the appropriate information and press “OK” to save your new tax agency.

Step 7: Save Your Sales Tax Items
Click the blue “OK” button to save your sales tax item.

Congratulations! You’ve created your first sales tax item. Repeat the process as many times as needed to get all of your sales tax rates added to QuickBooks.
How To Add A Sales Tax Group In QuickBooks Pro
Before you add a sales tax group, you’ll need to create the individual components of the sales tax group as sales tax items. Follow the “How To Add A Sales Item” instructions.
To begin adding a sales tax group, go to Edit>Preferences>Sales Tax>Company Preferences.
Step 1: Add A New Sales Tax Group
Begin by clicking the “Add sales tax item…” box.

You’ll be taken to a screen that looks like this:

Click the “Sales Tax Group” option.
Step 2: Create A Group Name Or Number
Create a name for your Sales Tax Group.

Step 3: Write A Description
Customize your sales tax group description.

Step 4: Select The Appropriate Tax Items
Now, you’ll need to add all of the individual Sales Tax Items that make up your combined Sales Tax Group by using the drop-down menu under Tax Item. If you need help determining which rate you need to include, refer to our Small Business Sales Tax Guide.

Step 5: Save Your Sales Tax Group
Click the blue “OK” button to save your sales tax group.

Repeat this process until all of your sales tax rates are successfully created.
How To Import Customers Into QuickBooks Pro
To import your customers, begin by going to Customers>Customer Center>Excel>Import from Excel.
Note: QuickBooks Pro recommends creating a backup company file before importing your customers.
Step 1: Select Customers
You’ll be taken to a screen that asks if you’re importing “Customers,” “Vendors,” or “Products I sell.”

Click “Customers.”
You should then be taken to a screen that looks like this:

Note: If your Excel file is already formatted like QuickBooks Pro’s Customer Import template, skip this step and click the “Advanced Import” section on the right-hand side of the screen to complete your import.
If this is your first import (or if you haven’t disabled this message), you’ll see a popup box warning that you can’t undo imported information. Don’t worry. Simply click “yes” to continue importing your contacts.

Step 2: Copy & Paste Your Customer Data
Next, you’ll need to copy the data from your existing Excel file (ours is on the right) and paste it into the QuickBooks Excel template file (on the left).

If you hover over a cell, QuickBooks Pro will give you instructions on what type of information should be included there. You’ll also find an example of how to format each cell above the column headings.

You can save the following customer information in QuickBooks:
- Company Name
- Mr./Mrs.
- First Name
- M.I.
- Last Name
- Display As
- Street 1
- Street 2
- City
- State
- Zip
- Phone
- Fax
- Alternative Phone
- E-mail
- Account Number
Step 3: Resolve Any Issues
Before you complete the import process, make sure there are no errors in your file. If there is an issue, QuickBooks Pro will put a message in the error box on the top left-hand side of the file and a red warning triangle in the corner of the problematic cell.

Even if there is an error, QuickBooks will tell you what’s wrong and how to fix it.
Step 4: Click Add My Data Now Button
Once all of your data is entered correctly, click the “Add My Data Now” Button.

Step 5: Save Your Changes
Since we haven’t saved the changes we made to our QuickBooks Excel template, we’ll need to save them now. Click “Save & Add My Data Now.” (If you click “I’ll Add My Data Later” you will lose your progress.)

Then you’ll need to save the file on your computer.
Step 6: Select The Appropriate File
After you save the document, the saved document should automatically appear in the box below. If not, click “Browse” and select the appropriate file.

Step 7: Import Your File
Click the blue “Add My Data Now” button on the bottom of the screen.

You should then be taken to a screen that looks like this:

Now your contacts have been successfully imported! You can view your customer list or go back to the Customer Center to see the proof for yourself.
How To Add Customers Manually In QuickBooks Pro
To manually add a customer in QuickBooks Pro, begin by going to Customers>Customer Center>New Customer & Job>New Customer.
Step 1: Enter The Contact's Name
Type your contact’s name.

Step 2: Add An Opening Balance
You can add an opening balance for pre-existing customers. This step is optional.

If you add an opening balance, you’ll also need to select the “as of” date. You can click on the blue “How do I determine an opening balance?” link for more details.

Step 3: Enter Customer Contact Info
Add the company name associated with your contact.

Enter your contact’s full name and title.

Fill in your contact’s job title.

Use the drop-down menus to save eight fields of contact details. You can choose to save the following contact information:
- Main Phone
- Home Phone
- Work Phone
- Mobile
- Alt. Phone
- Alt. Mobile
- Main Email
- CC Email
- Alt. Email 1
- Alt. Email 2
- Website
- LinkedIn
- Facebook
- Twitter
- URL 1
- URL 2
- URL 3
- URL 4
- Skype ID
- Other 1
- Other 2
- Other 3

Edit your contact’s address information.

If your contact’s shipping address is the same as their billing address, click “Copy>>.” If not, fill in the proper shipping address now. Then click the blue “OK” button.

Step 4: Adjust Payment Settings
Add an account number for your contact (if applicable).

Select the proper default terms for your customer. These terms will appear on every estimate or invoice you send to your customer (though the defaults can be overridden or changed at any time). You can choose between:
- 1% 10 Net 30
- 2% 10 net 30
- Due on Receipt
- Net 15
- Net 30
- Net 60

Choose a preferred delivery method that will be used when you send estimates and invoices to your contact. You can choose between:

You can set an optional credit limit for your customer if desired.

QuickBooks allows you to create price levels, which are basically a means of offering custom pricing for customers or jobs. You can add one now or click the blue question mark to learn more about this feature.

QuickBooks Pro gives you the option to save a contact’s credit card information if desired. You can add the credit card number, expiration date, name on card, address, and zip code.

You can opt to let your customers pay you via credit card or bank transfer. You’ll need to create a QuickBooks Payments account first. Once you’ve created an account, click the appropriate boxes for how you want your customer to pay (or come back and edit this later).

Step 5: Edit Sales Tax Settings
In order to save a default sales tax rate to your customer, you’ll need to select “Tax” from the Tax Code drop-down menu. If you don’t want to charge sales tax to this customer, select “Non.”

Select a default sales tax to charge your customer (you can override the default when creating estimates and invoices).

You can also choose to add a resale number if you’d like.

Step 6: Add Additional Information
Use the drop-down menu to note where this customer came from. You can choose a pre-made option or add your own.

If you want to link this customer to a specific sales representative, choose the appropriate employee using the drop-down menu.

You can also create a custom field for your contact. Click the “Define Fields” button in the bottom right-hand corner of the screen. Then write a label for your custom field and select whether that custom field applies to customers, vendors, or employees.

Step 7: Record Job Information
Add a job description for the project attached to your customer.

Choose the job type or add your own by selecting Add New.

Set a current status for this project. You can choose between:
- None
- Pending
- Awarded
- In progress
- Closed
- Not awarded

Use the calendars to set a project start date, projected end date, and end date (if available).

Step 8: Save The Contact
Finally, you can save your contact by clicking the blue “OK” button on the bottom of the screen.

You can view your customer list or go back to the Customer Center to make sure the customer saved correctly. Repeat this process as many times as needed until all of your customers are successfully added to your QuickBooks account.
How To Import Vendors Into QuickBooks Pro
To import your vendors, begin by going to Vendors>Vendor Center>Excel>Import from Excel.
Note: QuickBooks Pro recommends creating a backup company file before importing your vendors.
Step 1: Select Vendors
You’ll be taken to a screen that asks if you’re importing “Customers,” “Vendors,” or “Products I sell.”

Click “Vendors.”
You should then be taken to a screen that looks like this:

Note: If your Excel file is already formatted like QuickBooks Pro’s Vendor Import template, skip this step and click the “Advanced Import” section on the right-hand side of the screen to complete your import.
If this is your first import (or if you haven’t disabled this message), you’ll see a popup box warning that you can’t undo imported information. Don’t worry. Simply click “yes” to continue importing your vendors.

Step 2: Copy & Paste Your Vendor Data
Next, you’ll need to copy the data from your existing Excel file (ours is on the right) and paste it into the QuickBooks Excel template file (on the left).

If you hover over a cell, QuickBooks Pro will give you instructions on what type of information should be included there. You’ll also find an example of how to format each cell above the column headings.

You can save the following vendor information in QuickBooks:
- Company Name
- Mr./Mrs.
- First Name
- M.I.
- Last Name
- Display As
- Street 1
- Street 2
- City
- State
- Zip
- Phone
- Fax
- Alternative Phone
- E-mail
- Account Number
Step 3: Resolve Any Issues
Before you complete the import process, make sure there are no errors in your file. If there is an issue, QuickBooks Pro will put a message in the error box on the top left-hand side of the file and will put a red warning triangle in the corner of the problematic cell.

Even if there is an error, QuickBooks will tell you what’s wrong and how to fix it.
Step 4: Click Add My Data Now Button
Once all of your data is entered correctly, click the “Add My Data Now” Button.

Step 5: Save Changes
Since we haven’t saved the changes we made to our QuickBooks Excel template, we’ll need to save them now. Click “Save & Add My Data Now.” (If you click “I’ll Add My Data Later” you will lose your progress.)

Then you’ll need to save the file on your computer.
Step 6: Select The Appropriate File
After you save the document, the saved document should automatically appear in the box below. If not, click “Browse” and select the appropriate file.

Step 7: Import Your File
Click the blue “Add My Data Now” button at the bottom of the screen.

You should then be taken to a screen that looks like this:

Now your vendors have been successfully imported! You can view your vendor list or go back to the Vendor Center to see the proof for yourself.
How To Add Vendors Manually In QuickBooks Pro
To manually add a vendor in QuickBooks Pro, begin by going to Vendors>Vendor Center>New Vendor.
Step 1: Enter The Vendor's Name
Type your vendor’s name.

Step 2: Add An Opening Balance
You can add the opening balance you owe your vendors. This step is optional.

If you add an opening balance, you’ll also need to select an “as of” date. You can click on the blue “How do I determine the opening balance?” link for more details.

Step 3: Enter Vendor Contact Information
Add your vendor’s company name.

Enter your vendor’s full name and title.

Fill in your vendor’s job title.

Use the drop-down menus to save eight fields of vendor details, including:
- Main Phone
- Home Phone
- Work Phone
- Mobile
- Alt. Phone
- Alt. Mobile
- Main Email
- CC Email
- Alt. Email 1
- Alt. Email 2
- Website
- LinkedIn
- Facebook
- Twitter
- URL 1
- URL 2
- URL 3
- URL 4
- Skype ID
- Other 1
- Other 2
- Other 3

Edit your vendor’s address information.

If the vendor’s shipping address is the same as their billing address, click “Copy>>.” If not, fill in the proper shipping address now. Then click the blue “OK” button.

Step 4: Adjust Payment Settings
Add an account number for your vendor (if applicable).

Select the proper default terms for this particular vendor. You can choose between:
- 1% 10 Net 30
- 2% 10 Net 30
- Dues on receipt
- Net 15
- Net 30
- Net 60

Choose how you want your vendor’s name printed on checks (in our case, we chose the company name rather than the name of an individual at the company).

You can set a credit limit if desired.

Much like customer pricing levels, it’s possible to create billing rate levels in QuickBooks. You can add one now or click the blue question mark to learn more about this feature.

Step 5: Edit Tax Settings
If applicable, enter a vendor tax ID. At this time, also mark whether the vendor is eligible for a 1099 tax form (1099’s are used for freelancers and independent contractors).

Step 6: Edit Account Settings
Tell QuickBooks where you want vendor bill transactions to be recorded. Choose an expense account from the chart of accounts drop-down menu.

Step 7: Add Additional Information
Use the drop-down menu to note where this customer came from. Vendor types include:
- Consultant
- Service providers
- Suppliers
- Supplies
- Tax agency

You can also create a custom field for your vendor. Click the “Define Fields” button in the bottom right-hand corner of the screen. Then write a label for your custom field and select whether that custom field applies to contact, vendors, or employees.

Step 8: Save The Vendor
Finally, save your vendor by clicking the blue “OK” button on the bottom of the screen.

You can view your vendor list or go back to the Vendor Center to make sure the vendor saved correctly. Repeat this process as many times as needed until all of your vendors are successfully added to your QuickBooks account.
How To Import Items Into QuickBooks Pro
To import your items, begin by going to File>Utilities>Import>Excel Files.
Note: QuickBooks Pro recommends creating a backup company file before importing your items or products.
Step 1: Select The Type Of Data To Import
You’ll be taken to a screen that asks if you’re importing “Customers,” “Vendors,” or “Products I Sell.”

Click “Products I Sell.”
You should then be taken to a screen that looks like this:

Note: If your Excel file is already formatted like QuickBooks Pro’s Customer Import template, skip this step and click the “Advanced Import” section on the right-hand side of the screen to complete your import.
If this is your first import (or if you haven’t disabled this message), you’ll see a popup box warning that you can’t undo imported information. Don’t worry. Simply click “yes” to continue importing your products.

Step 2: Copy & Paste Your Item Data
Next, you’ll need to copy the data from your existing Excel file (ours is on the right) and paste it into the QuickBooks Excel template file (on the left).

If you hover over a cell, QuickBooks Pro will give you instructions on what type of information should be included there. You’ll also find an example of how to format each cell above the column headings.

You can save the following customer information in QuickBooks:
- Product Name
- Description
- Sales Price
- Manufacturing Part Number
- Tracked as Inventory
If you are tracking inventory, it’s important to know that QuickBooks Pro automatically puts “No” in the Tracked Inventory Excel column. You’ll have to manually change this to “Yes” for inventory items.
Step 3: Resolve Any Issues
Before you complete the import process, make sure there are no errors in your file. If there is an issue, QuickBooks Pro will put a message in the error box on the top left-hand side of the file and a red warning triangle in the corner of the problematic cell.

Even if there is an error, QuickBooks will tell you what’s wrong and how to fix it.
Step 4: Click Add My Data Now Button
Once all of your data is entered correctly, click the “Add My Data Now” Button.

Step 5: Save Changes
Since we haven’t saved the changes we made to our QuickBooks Excel template, we’ll need to save them now. Click “Save & Add My Data Now.” (If you click “I’ll Add My Data Later” you will lose your progress.)

Then you’ll need to save the file on your computer.
Step 6: Select The Appropriate File
After you save the document, the saved document should automatically appear in the box below. If not, click “Browse” and select the appropriate file.

Step 7: Import Your File
Click the blue “Add My Data Now” button on the bottom of the screen.

You should then be taken to a screen that looks like this:

Now your items have been successfully imported! You can view your item list to see the proof for yourself.
How To Add Inventory Items Manually In QuickBooks Pro
If you want to add inventory items manually in QuickBooks Pro, start by going to Lists>Items List>Item>New (or you can use the shortcut “Ctrl+N” once you’re on the Items List page).
Step 1: Enter Basic Info About The Item
Use the drop-down menu to select “Inventory Part.”

Type your item’s name or number.

If your item is a subitem of another inventory part, check the “Subitem of” box and use the drop-down menu to select the correct inventory part.

Step 2: Add Purchase Information
Next, add purchase information starting with a purchase description.

Enter the cost you pay for this inventory item.

Select a default account where your COGS (Cost of Goods Sold) will be recorded.

If desired, you can select a preferred vendor for your item.

Step 3: Add Sales Information
Write a sales description. Your customers will see this description on the quotes and estimates you send them.

Enter the sales price you charge for this item.

Use the drop-down menu to select whether your item is taxable or non-taxable.

Select a default account where your income will be recorded.

Step 4: Select Asset Account
Select a default account where your inventory assets will be recorded.

Step 5: Set Reorder Point
One of the best parts about QuickBooks’ inventory feature is that you can set a reorder point for your inventory. The software will send you a low inventory reminder when an item’s count hits the reorder point you set.

Step 6: Enter Amount On Hand
Enter the item amount you have on hand.

Step 7: Verify Total Value
QuickBooks will automatically calculate the total value of your inventory on hand for a particular item, but double-check that the numbers look right before proceeding to the next step.

Step 8: Select Inventory Date
Choose the date of your last inventory count (the count that gave you the “amount on hand” data).

Step 9: Save Item
Click the blue “OK” button in the top right-hand corner to save your item, or select “next” if you’re planning on adding another item.

How To Add Non-Inventory Items Manually In QuickBooks Pro
To manually add non-inventory items to QuickBooks Pro, begin by going to Lists>Items List>Item>New (or you can use the shortcut “Ctrl+N” once you’re on the Items List page).
Step 1: Enter Basic Info About The Item
Use the drop-down menu to select “Non-inventory Part.”

Type your item’s name or number.

If your item is a subitem of another non-inventory part, check the “Subitem of” box and use the drop-down menu to select the correct non-inventory part.

If your item is used in assemblies or purchase for a specific job, click on the check box shown below:

Step 2: Add Sales Information
Write a sales description. Your customers will see this description on the quotes and estimates you send them.

Enter the sales price you charge for this item.

Use the drop-down menu to select whether your item is taxable or non-taxable.

Select a default account where your income will be recorded.

Step 3: Save Item
Click the blue “OK” button in the top right-hand corner to save your item, or select “next” if you’re planning on adding another item.

How To Add Services Manually In QuickBooks Pro
To add services to QuickBooks Pro, begin by going to Lists>Items List>Item>New (or you can use the shortcut “Ctrl+N” once you’re on the Items List page).
Step 1: Enter Basic Info About The Service
Use the drop-down menu to select “Service.”

Type your service’s name or number.

If your item is a subitem of another service, check the “Subitem of” box and use the drop-down menu to select the correct service item.

Step 2: Add Sales Information
Write a description of the service you’re selling. Your customers will see this description on the quotes and estimates you send them.

Enter the rate you charge for this service.

Use the drop-down menu to select whether your service item is taxable or non-taxable.

Select a default account where your income will be recorded.

Step 3: Save Item
Click the blue “OK” button in the top right-hand corner to save your item, or select “next” if you’re planning on adding another item.

Once you save your items, you can view them in the Items List and start invoicing customers.
How To Add Employees In QuickBooks Pro
To add employees in QuickBooks Pro, go to Employees>Employee Center>New Employee.
Step 1: Enter Employee's Personal Info
Type your employee’s legal name.

Choose how you want your employee’s name printed on checks.

Type your employee’s social security number using this format: XXX XX XXXX.

Use the drop-down menu to select your employee’s gender.

Use the drop-down calendar to select your employee’s date of birth.

Select your employee’s marital status. The options include:
- Married
- Single
- Divorced
- Separated
- Widowed
- Domestic Partner

Select whether or not your employee is a US citizen using the drop-down menu.

Use the drop-down menu to select your employee’s ethnicity. Choose from:
- American Indian | Alaska Native
- Asian
- Black | African American
- Hawaiian | Pacific Islander
- Hispanic | Latino
- White
- Two or more races

Enter information regarding any employee disabilities. Use the drop-down menu to indicate if the employee is disabled.

If “Yes” is selected, you can add any additional information using the disability description line.

If your employee is not a US citizen, mark whether there is an I-9 form on file for that employee using the drop-down menu.

Also, select the date their work authorization expires using the drop-down calendar.

Use the drop-down menu to select whether or not your employee is a US veteran.

If you selected yes, mark their military status as active or reserve.

At this point, you can enable payroll if desired. This feature comes at an additional cost. Click the blue “turn on payroll” link to be taken to the QuickBooks Payroll page.

Select the pricing plan and move forward with setting up your payroll in QuickBooks.
Step 2: Add Address & Contact Info
Add your employee’s address information.

Type in your employee’s main phone number.

Enter your employee’s main email.

Use the drop-down menus to save six fields of employee details, including:
- Work phone
- Home phone
- Mobile
- phone
- mobile
- Fax
- Alt Fax
- CC Email
- Alt Email 1
- Alt Email 2
- Website
- LinkedIn
- Facebook
- Twitter
- URL 1
- URL 2
- URL 3
- URL 4
- Skype ID
- Other 1
- Other 2
- Other 3

Add a primary and secondary emergency contact for your employees. Include the emergency contact’s name, phone number, and relation.

Add your employee’s account number or employee ID if applicable.

You can also create a custom field for your employee. Click the “Define Fields” button in the bottom right-hand corner of the screen. Then write a label for your custom field and select whether that custom field applies to contact, vendors, or employees.

Step 3: Create A Payroll Schedule
If desired, create a payroll schedule for your employee. According to QuickBooks, “Payroll schedules allow you to group employees who have the same pay frequency in whichever way that helps make your payroll runs convenient and hassle-free.”
To create a payroll schedule, go to Payroll Schedule>Add New. You’ll be taken to the screen below, where you’ll be prompted to tell the software what you want to name the payroll schedule, how often your employees get paid, the pay period end date, and the date that should appear on paychecks for the pay period.

Once all of the information looks right, click the blue “OK” button in the bottom right-hand corner of the screen.
Step 4: Select Pay Frequency
Select how often you pay your employees. You can choose from:
- Daily
- Weekly
- Biweekly
- Semimonthly
- Monthly
- Quarterly
- Annually

Step 5: Enable Direct Deposit
If you are set up for QuickBooks payroll, you can set up direct deposit for your employees. Simply click on the “Direct deposit” button in the top right-hand corner of the screen.

Step 6: Add Tax Information
Next, you’ll need to add your employee’s tax information. This step may require the assistance of your accountant or tax professional. Click on the tax button in the top right-hand corner.

Federal Taxes
Employee taxes are divided into three sections: federal, state, and other. For the federal tax section, first, select your employee’s filing status.
Then note any allowances your employee claims.
Next, enter any extra withholding value.
If your employee is subject to Medicare, social security, advance earned income credit, or federal unemployment tax (or any combination of the four), make sure the appropriate boxes are clicked. Don’t click “OK” quite yet.

State Taxes
Next, click on the “State” tax tab. Select the state your employee works in.
Certain additional criteria may pop up depending on the state you collect. For example, when we selected California, an SUI (State Unemployment Insurance) and an SDI (State Disability Insurance) box popped up. If your employee qualifies for these, make sure the appropriate boxes are clicked. (Selections vary by state).
Select a state subject to withholding, if applicable.
Add any miscellaneous data and/or previous state data. Don’t click “OK” quite yet.

Other Taxes
Add any other taxes if needed. If you don’t have any other taxes to add, you can finally click the blue “OK” button in the top right-hand corner. If you do, go to the “Other” tab and click on Item>Add New.
The actual process for adding other taxes is a bit lengthy, but we’ll explain it step by step to make the process as easy as possible.
Choose your tax from the “Other tax” drop-down menu. If you don’t see your tax, create a “User-Defined Tax.”

Choose whether you pay the tax or your employee pays the tax. Then click “Next.”

Enter a name for your tax. Then click “next.”

Use the drop-down menu to select the name of the associated tax agency.

Add the number by which that tax agency identifies you.

Select the liability account to which you want this tax attached. Then click “Next.”

Next, select a tax tracking type from the drop-down menu. (According to QuickBooks, “The tax tracking type determines how the payroll item appears on tax forms.”) Then click “Next.”

Choose whether the tax is calculated based on quantity, hours, or neither. Then click “Next.”

Set a default rate and limit. Use the drop-down menu to select a limit type as well. You can choose from:
- Annual — restart each year
- Monthly — restart each month
- One-time
Then click “Next.”

Check the boxes next to items that “increase wages for this tax.” Then click “Next.”

Check the boxes next to items that “reduce wages for this tax.” Then you can finally click “Finish.”
Repeat these steps until all other taxes are added into QuickBooks correctly.
Step 7: Set Sick & Vacation Day Policies
Enter the proper amount of sick days and vacation days allotted to your employee. Begin by clicking on the “Sick/Vacation…” button in the top right-hand corner.

For sick days, you’ll need to add the number of hours available as of the day you began using QuickBooks.

Then enter the number of hours that have been used so far this year.

Choose an accrual period. This dictates when your employees get paid for the sick days. Choose from:
- Beginning of the year (i.e. the first paycheck in January)
- Every paycheck
- Every hour on paycheck
Depending on which option you select, you’ll be asked to enter the hours accrued at the beginning of the year, the hours accrued per paycheck, or the hours accrued per hour paid.

Enter the maximum number of sick day hours available to that employee.

If your employee’s sick pay hours reset each year, check the box.

Tell QuickBooks what day your business year begins so it can accurately track the sick days.

Tell QuickBooks which day to begin accruing sick pay using the drop-down menu.

Before you click the “OK” button, be sure to add your employee’s vacation days.
For vacation days, follow the same steps you used for adding sick days. When all of the information looks correct, click the blue “OK” button in the top right-hand corner.

Step 8: Choose Employee Pay Rate
Much like adding “Other Taxes,” adding employee earnings can take a bit of time, but we’ll walk you through the whole process step by step, so you can start recording the proper pay rates for your employees.
First, click on Item Name>Add New. Select the type of payroll item you’re adding. Choose from:
- Hourly wages
- Annual salary
- Commission
- Bonus
Then click “Next.”

Choose whether the item you’re creating is for:
- Regular pay
- Overtime pay
- Sick pay
- Vacation pay
Then click “Next.”

Enter a name for the payroll item. Then click “Next.”

Select the expense account you want to be attached to this payroll item.

Then click “Finish.” Repeat as many times as necessary for other pay rates, like overtime, holiday pay, sick pay, and vacation pay. Be sure to manually fill in the hourly/annual rate for each item.

Before you click the blue “OK” button at the bottom of the screen, add all necessary deductions and company contributions.
Step 9: Add Deductions & Company Contributions
The process for entering addition, deductions, and/or company contributions is incredibly similar to adding earnings. You may need the help of your accountant or tax expert to complete this step.
To begin, click on Item Name>Add New. Select the type of payroll item you’re adding. Choose from:
- Addition (tips, advances, etc.)
- Deduction (health insurance, retirement plans, social security, flexible spending accounts, HSA plans, etc.)
- Company Contribution (health insurance, retirement plans, social security, flexible spending accounts, HSA plans, etc.)
Note: According to QuickBooks, the difference between deductions and company contributions is that “the company pays a contribution and the employee pays a deduction.”

Enter a name for the payroll item. You may be asked to “track expenses by job.” Click “Help” to learn if this setting is right for you. Then click “Next.”

Use the drop-down menu to select the name of the associated tax agency.

Add the number that the tax agency identifies you by.

Select the liability account and expense account you want this payroll item attached to. Then click “Next.”

Select a tax tracking type from the drop-down menu. (According to QuickBooks, “The tax tracking type determines how the payroll item appears on tax forms.”) Then click “Next.”

QuickBooks will automatically select the taxes that are affected by the tax tracking type you selected. QuickBooks says, “in most cases, you don’t need to change the selections you see here.” We recommend double-checking these selections with your accountant or tax professional to be certain.

Choose whether the payroll item is calculated based on quantity, hours, or neither. Then click “Next.”

Set a default rate and limit. Use the drop-down menu to select a limit type as well. You can choose from:
- Annual — restart each year
- Monthly — restart each month
- One-time

Then click “Finish.” Repeat as many times as necessary for other additions, deductions, and contributions. Be sure to manually fill in the amount and limit for each item. Once all of the information looks correct, move on to the next step. Everything is smooth sailing from here.
Step 10: Add Employment Information
Enter your employee’s hire date, original hire date, adjusted service date, and release date (if applicable).

Choose the proper employee type. Choose from:
- Regular
- Officer
- Statutory
- Owner

Mark whether your employee is full-time or part-time.

Choose whether your employee is tax-exempt or non-tax-exempt.

Here you can mark whether or not this employee is a “key employee.”

Add your employee’s job title.

Attach a supervisor to your employee. This step is optional.

Select the proper department.

You can choose to write a description for your employee and include it here.

If you have a target bonus for your employee, you can add it here.

Enter any leave of absence information for your employee. First, select the start date, expected return date, and actual return date (if applicable).

Enter the type of leave of absence.

Add an optional description for the leave of absence.

Select whether the leave of absence is paid or unpaid.

If applicable, enter the termination details for your employee. First, add the last day worked, last day of benefits, and last day on payroll.

Add a termination type.

Next, add a termination reason.

Select whether or not you would recommend this employee for rehire in the future.

Select whether or not you are protesting an unemployment claim.

Select “Yes” or “No” for severance paid and add any additional notes.

Step 11: Save The Employee Info
Finally, you can click the blue “OK” button at the bottom of the screen to save your employee.
You can view your employee list or go back to the Employee Center to make sure your employee saved correctly. Repeat this process as many times as needed until all of your employees (and past employees) are successfully added to your QuickBooks account.
How To Create An Invoice In QuickBooks Pro
You’ll want to customize your invoice templates before you start sending them to clients. Once the invoice template is to your liking, start creating an invoice by going to Customer>Create Invoices (or click Ctrl+I).
Step 1: Select A Customer & Verify Info
Begin by selecting the customer you want to invoice from the drop-down menu. If you can’t find the customer, you can click “<Add New>” to create a new customer.

If you’ve already generated an estimate for that customer, you may receive this notification:

Select the estimate and click the blue “OK” button, and QuickBooks will automatically convert your estimate to an invoice.
Once you’ve selected the customer, take a look at the date issued, invoice number, billing address, and shipping address to ensure all of the information is correct.

Step 2: Choose An Invoice Template
Select the invoice template you’d like to use from the drop-down menu.

Step 3: Set Terms & Due Date
Next, select the proper invoice payment terms. You can choose between:
- 1% 10 Net 30
- 2% 10 net 30
- Due on receipt
- Net 15
- Net 30
- Net 60

Use the drop-down calendar to select an invoice due date.

If desired, you can also select a sales representative to attach to the invoice.

Step 4: Add Items
Choose which items to include in your invoice using the drop-down menu. If needed, you can click “<Add New>” to create a new item. Repeat this step as many times as necessary to include all of your customer’s items.

Once you’ve added your items, be sure to adjust the item quantity, as QuickBooks automatically leaves this field blank.

Step 5: Enter Tax Information
Choose whether this invoice is taxable or non-taxable.

If required, select the proper sales tax for your estimate. QuickBooks will use the sales tax percentage you select to automatically calculate the sales tax total and add it directly to your customer’s overall total.

If applicable, select a customer tax code using the drop-down menu.

Step 6: Add Messages & Memos
While this field is technically optional, we highly recommend adding a custom message.
QuickBooks makes it easy. You can select one of five preset customer messages using the drop-down menu, or you can click “<Add New>” to write your own.

You can also include a memo if desired.

Step 7: Attach Files
You can attach files (e.g., contracts, photos, or terms and conditions) to invoices. Simply click the “Attach File” button on the top of the screen (it looks like a paperclip).
From there, you can browse and select or drag and drop a file from your computer or Outlook. You can also use the scanner feature to upload files.

Step 8: Send The Invoice
Now you’re finally ready to send your invoice! You can send invoices via email or traditional mail.
If you’re sending invoices by email, go to the “Email” button at the top of the screen. Choose “Invoice” to send the single estimate or “Batch” to send multiple invoices to a customer.

Be sure to customize your email messages before clicking “Send.” Customers will receive emailed invoices as PDFs.

If you’re sending invoices by mail, go to the print button at the top of the screen and choose “Print.” Then, simply mail your invoice. You can also print address labels if desired.

How To Create An Estimate In QuickBooks Pro
It’s a good idea to customize your QuickBooks Pro estimate templates before you start sending them to clients. Once the template is to your liking, start creating an estimate by going to Customer>Create Estimates.
Step 1: Select A Customer & Verify Info
Begin by selecting the customer you want to send an estimate to from the drop-down menu. If you can’t find the customer, you can click “<Add New>” to create a new customer.

Take a look at the date, estimate number, and customer name/address to make sure all of the information is correct.

Step 2: Choose A Template
Select the estimate template you’d like to use from the drop-down menu.

Step 3: Select Payment Terms
Next, select the proper payment terms. You can choose between:
- 1% 10 Net 30
- 2% 10 net 30
- Due on Receipt
- Net 15
- Net 30
- Net 60

Step 4: Add Items
Choose which items to include in your invoice using the drop-down menu. If needed, you can click <Add New> to create a new item. Repeat this step as many times as needed in order to include all of your customer’s items.

Once you’ve added your items, be sure to adjust the item quantity as QuickBooks automatically leaves this field blank.

Step 5: Enter Tax Information
Choose whether this estimate is taxable or non-taxable.

If required, select the proper sales tax for your estimate. QuickBooks will use the sales tax percentage you select to automatically calculate the sales tax total and will add it directly to your customer’s overall total.
If applicable, select a customer tax code using the drop-down menu.


Step 6: Add Messages & Memos
While this field is technically optional, we highly recommend adding a custom message to customers.
QuickBooks makes it easy. You can select one of five preset customer messages using the drop-down menu, or you can click “<Add New>” to write your own.

Include a memo if desired.

Step 7: Attach Files
You can attach files (like contracts, photos, or terms and conditions) to estimates. Simply click the “Attach File” button on the top of the screen (it looks like a paperclip).
From there, you can browse and select or drag-and-drop a file from your computer or Outlook. You can also use the scanner feature to upload files.

Step 8: Send The Estimate
Now you’re finally ready to send your estimate! You can send estimates via email or traditional mail.
If you’re sending estimates by email, go to the Email button at the top of the screen. Choose “Estimate” to send a single estimate or “Batch” to send multiple estimates to a customer.

Be sure to customize your email messages before clicking “Send.” Customers will receive emailed estimates as PDFs.

If you’re sending estimates by mail, go to the top of the screen and choose “Print.” You can also print envelopes with a pre-filled return address if desired.

Now all you need to do is mail your estimate.
In the future, you can use the “Create Copy” button to duplicate this estimate and send it to another customer. You can also easily convert estimates to invoices when the time comes.
How To Track Time In QuickBooks Pro
To enter time into QuickBooks Pro, begin by going to Customers>Enter Time>Time/Enter Single Activity.
Step 1: Choose The Date
Choose the date for the hours you wish to track using the drop-down calendar.

Step 2: Select Employee
Select the proper employee for the hours worked.

When you click on an employee, you’ll receive this popup message.

Click “Yes” if you want the hours you enter to automatically be added to your employee’s payroll timesheet.
Step 3: Select Customer Or Job
Use the drop-down menu to select the customer or job attached to these hours.

Step 4: Choose Service Item
Use the drop-down menu to select the service item performed for your customer or job during these hours. If you haven’t added any services yet, read the previous section in this guide on how to add items in QuickBooks Pro.

Step 5: Choose Payroll Item
Select a payroll item. If you haven’t created payroll items yet, refer to the section in this guide on how to add an employee in QuickBooks Pro.
The payroll selections available will depend on how your company is set up, but here are the payroll items we had to choose from as an example:
- Contractor rate
- Holiday overtime
- Hourly overtime
- Hourly rate
- Starting hourly rate

Step 6: Enter Time
To enter time, you can manually type in the amount of time worked, or you can use the built-in timer to track your hours while you’re working.
Step 7: Add Notes
You and your employees can add optional notes about the hours worked.

Step 8: Mark As Billable
Mark whether the hours are billable or unbillable using the box in the top right-hand corner.

Step 9: Save Time Entry
To record your time, click “Save & Close.” Click “Save & New” if you’re planning on making another time entry.

You can now print timesheets or run multiple time-related reports like Time by Job Summary, Time by Job Detail, or Time by Item.
How To Create A Timesheet In QuickBooks Pro
To edit a timesheet in QuickBooks Pro, begin by going to Customers>Enter Time>Edit Weekly Timesheet.
Step 1: Select Employee
Select the proper employee for the hours worked.

Step 2: Choose Work Week
Choose the proper work week dates using the calendar icon.

Step 3: Select Customer Or Job
Use the drop-down menu to select the customer or job attached to these hours. If multiple projects are being worked on in a single timesheet, use one line each per customer or project.

Step 4: Choose Service Item
Use the drop-down menu to select the service item performed for your customer or job during these hours. If you haven’t added any services yet, refer to the section in this guide on how to add items in QuickBooks Pro.

Step 5: Choose Payroll Item
Use the drop-down menu to select the service item performed for your customer or job during these hours. If you haven’t added any services yet, read the section on how to add services in this guide.

Step 6: Enter & Verify Hours
Enter the hours worked each day of the week. (Use the format 0:00 for entering exact hours and minutes; use the format 0.00 if you want QuickBooks to automatically change a decimal into hours and minutes.)

QuickBooks automatically totals the hours worked, but be sure to double-check that the amount looks correct.

Step 7: Mark As Billable
Mark whether the hours are billable or unbillable using the box in the top right-hand corner.

Step 8: Save Timesheet
To save your timesheet, click “Save & Close.” Click “Save & New” if you’re planning on adding another timesheet.

How To Run Reports In QuickBooks Pro
To run a report in QuickBooks Pro, go to Reports>Report Center or access the Report Center under “My Shortcuts” on the left-hand side of your QuickBooks Pro account.
Step 1: Choose A Report
The hardest part of this whole process will probably be deciding which of the 120 reports to run. QuickBooks tries to help you by keeping things organized.
Across the top of the screen, you’ll see tabs for Standard Reports, Memorized Reports, Favorites, Recent, and Contributed. Until you customize your Reports Center with Memorized and Favorite Reports, you’ll go to Standard Reports.
Standard Reports are divided into these report categories:
- Company & financial
- Customer & receivables
- Sales
- Jobs, time & mileage
- Vendors & payables
- Purchases
- Inventory
- Employees & payroll
- Banking
- Accountant & taxes
- Budgets
- Lists

Click on the appropriate category, then select the report you wish to run. If you need help understanding a report, click the magnifying glass icon for more information. For our sample company, we’re going to create a Profit & Loss Standard Report.

Step 2: Select Date Range
Select the date range you want for the report data. You can enter the dates manually underneath the report you selected, or you can choose a default date type, including:
- Today
- This week
- This week-to-date
- This month
- This-month-to-date
- This fiscal quarter
- This fiscal quarter-to-date
- This fiscal year
- This fiscal year-to-last month
- This fiscal year-to-date
- Yesterday
- Last week
- Last week-to-date
- Last month
- Last month-to-date
- Last fiscal quarter
- Last fiscal quarter-to-date
- Last fiscal year
- Last fiscal year-to-date
- Next week
- Next four weeks
- Next month
- Next quarter
- Next fiscal quarter
- Next fiscal year
- Custom

Step 3: Run The Report
You’ll see the four icons pictured below.

The green arrow runs the report; the magnifying glass shows you more information about the report; the heart ‘favorites’ this report for you; the blue question mark is for help. When you’re ready to run the report, click the green arrow.
Step 4: Choose Report Basis
Choose either accrual or cash-basis accounting for your report.

Step 5: Adjust Filters
Click “Show filters.” Then delete filters if needed. You can create additional filters during step 9.

Step 6: Verify Date Range
If you already selected a date, you can move on to step 7. If not, select a date type as well as a start and end date.

Step 7: Select Included Columns
Choose which columns to include in your report (column selections may vary by report). You can choose:
- Total only
- Day
- Week
- Two week
- Four week
- Half month
- Month
- Quarter
- Year
- Customer: Job
- Vendor
- Employee
- Payroll Item Detail
- Payee
- Rep Class
- Item Type
- Item Detail
- Shipping Method
- Terms
- Payment Method
- Sales Tax Code

Step 8: Select Sorting Default
If desired, you can change the sorting default.

Step 9: Customize Report
You can customize your reports. While customizations may vary by each report, you will often be able to change the data shown and edit the filters, headers, footers, and overall appearance. Click the blue “OK” button when you’ve finished your alterations.

QuickBooks Pro gives you the option to comment on your report. Click the “Comment on Report” button in the top left-hand corner, then click the small chat bubble next to the lines you wish to comment on.

Type your comment in the box and click “Save” when done.

Step 11: Share Report Template
You can choose to share your customized report with the QuickBooks Community if desired by clicking the “Share Template” button on the top of the screen. Your template will be shared with other QuickBooks users who can then use your customized template for their businesses (none of your report data will be shared, only the template format).

Step 12: Take Action
Finally, choose whether to print, email, or export your report.

Print Report
Click the “Print” button and choose whether to print the report or save the report as a .pdf.

Adjust your print settings and click the blue “Print” button when ready.

Email Report
To email your report, click the “E-mail” button and choose whether to email the report as an Excel file or as a .pdf.

You’ll receive a message warning you that email is not secure and could be dangerous if sending sensitive information. If this is okay with you, click the blue “OK” button.

Next, enter the appropriate email recipient address and edit the body of the email message. Click the blue “Send” button when ready.

Export Report To Excel
To export your report, click the “Excel” button. Then choose whether you are creating a new Excel worksheet or updating an existing worksheet.

Tell the software what to do with the report. You can choose between:
- Create new worksheet
- Update existing worksheet
- Replace existing worksheet
- Create a comma-separated values (.csv) file
Certain selections may require additional information. Once everything looks correct, click the blue “Export” button and save the file accordingly.

Repeat this process anytime you’d like to create a report.
Start Using QuickBooks Pro For Your Accounting
Congratulations! You’ve officially set up your QuickBooks Pro account. Now that you’ve created your account, learned how to navigate the software, and added all of your company information, you can start using QuickBooks Pro to run your business successfully.
If you have any questions along the way, don’t forget about the Help tab on your QuickBooks toolbar. You can also check the QuickBooks Community for extra help.