Setting Up Shopify Payments
Shopify's built-in payment processing feature allows you to accept credit card payments, and could be a money-saving addition to your Shopify store.
-
WRITTEN & RESEARCHED BY
Expert Contributor
Last updated onUpdated
-
REVIEWED BY
Expert Contributor


Our content reflects the editorial opinions of our experts. While our site makes money through referral partnerships, we only partner with companies that meet our standards for quality, as outlined in our independent rating and scoring system.
Key Takeaways
- To set up Shopify Payments, you'll need to verify eligibility, complete your account setup, and configure settings within Shopify, with options to test transactions and enable Shopify POS for in-person sales.
- Shopify Payments has competitive transaction fees and supports multiple currencies, but certain high-risk industries and products are prohibited, requiring alternative processors.
Shopify is a popular commerce platform that offers a wide variety of sales tools and services to businesses. The Shopify ecosystem is gigantic, potentially serving as a one-stop shop for online stores, POS hardware, inventory management, staff management, and more.
For this post, however, we’re going to focus on one important part of Shopify’s infrastructure: its role as one of the best credit card processing companies. Welcome to our deep dive into Shopify Payments.
Table of Contents
- What Is Shopify Payments?
- How To Set Up Shopify Payments
- Choosing Additional Shopify Payment Methods
- How Much Does Shopify Payments Cost?
- Shopify Payouts: When & How Does Shopify Pay You?
- Linking Shopify & Your Bank Account
- Shopify Prohibited Items: What You Can & Can’t Sell With Shopify Payments
- Taking The Next Step With Shopify Payments
What Is Shopify Payments?
Shopify Payments is Shopify’s built-in payment processing feature, which allows you to accept credit and debit cards, as well as additional payment methods. By default, Shopify Payments is a white-label version of Stripe and shares most of Stripe’s strengths and weaknesses.
Merchants using Shopify aren’t required to use Shopify Payments as their processor. It’s possible to plug a different service into the app, but this can come with added costs and inconveniences.
How To Set Up Shopify Payments
If your business is eligible for Shopify Payments, it just takes a few steps to set up your account. For the purposes of this guide, we’re assuming that you already have a Shopify account and store set up.
One thing to note is that you may be asked to verify your identity while using Shopify Payments. When this occurs, your payouts may be on hold, but your store and ability to process payments should remain active during that time.
Step 2a: Complete Your Account Setup
Before you can take payments, you need to make sure Shopify has the necessary information about your business. While this is a fairly simple step, it’s also likely to be the most time-consuming.
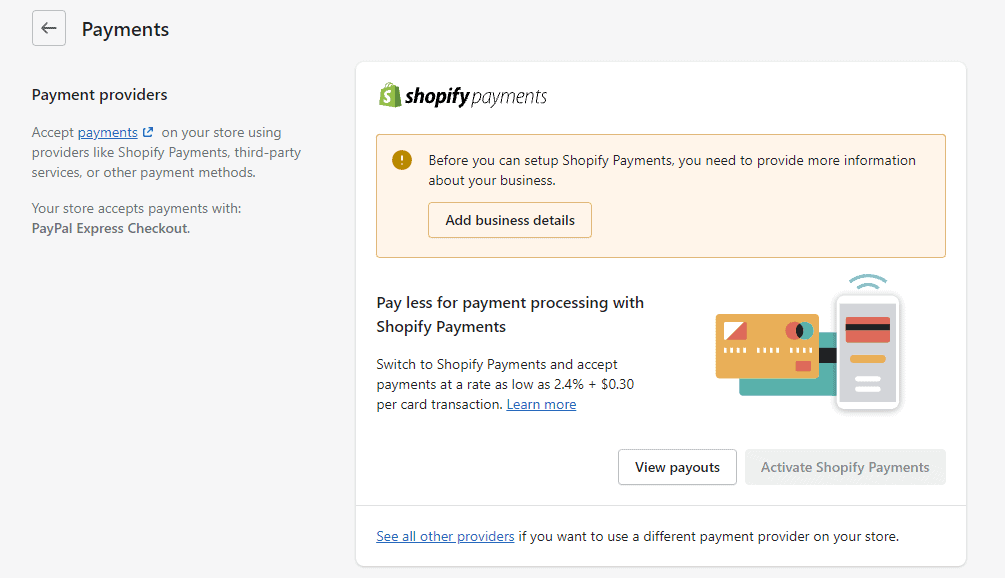
- Go to Settings > Payments.
- If you haven’t already added them, you’ll be prompted to Add business details. You’ll need to enter your EIN (or other applicable identifier) and select your business type. You may also be asked to fill out the Personal Details section depending on your type of business. After providing any requested documentation, you’ll be ready to move forward.
Choosing Additional Shopify Payment Methods
It’s possible to add additional payment method options without replacing Shopify Payments. This doesn’t require any additional fees upfront. You also only pay the transaction fees for the gateway the transaction used, so you won’t be double-billed.
Shopify breaks these payment methods down into alternative payment methods and manual payment methods.
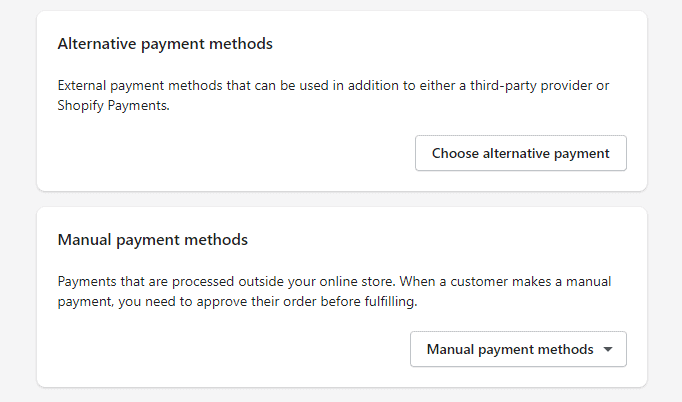
Alternative Payment Methods
Shopify makes the process fairly straightforward. Popular payment methods like PayPal and Amazon Payments get their own interfaces. You can find other major payment methods, such as Alipay, under the Alternative payment methods block. Just follow the instructions for the selected payment method. Transaction fees vary by payment method.
Manual Payment Methods
Manual payment methods are methods not covered by any other category. These include cash-on-delivery, money orders, and bank transfers. There’s no transaction fee for a manual payment method. Instead, the order is marked unpaid until you manually mark it as paid.
How Much Does Shopify Payments Cost?
The cost of Shopify Payments is based on a number of factors. The good news is that Shopify waives the typical 0.5%-2% commission charge if you use Shopify Payments to process your transactions. Shopify Payments charges a flat rate for all transactions.
Here’s where it gets a little confusing. While there’s no monthly fee specifically for Shopify Payments, your Shopify plan will affect the amount you’re paying for transactions.
- Shopify Basic
- Online: 2.9% + $0.30
- In-person: 2.6% + $0.10
- Shopify
- Online: 2.7% + $0.30
- In-person: 2.5% + $0.10
- Shopify Advanced
- Online: 2.5% + $0.30
- In-person: 2.4% + $0.10
Shopify Currency Converter & Multi-Currency Checkout
One of the advantages of Shopify Payments being powered by Stripe is that it inherits Stripe’s multi-currency transaction support. This feature has the potential to open new markets for your products.
You can enable Shopify’s multiple currency converter by going to Settings > Payments and clicking on Manage in the Shopify Payments section. Under Countries/Regions, select and add the country or region you want to sell to. You can then add a currency selector through Shopify’s Geolocation app or a third-party solution. This allows a customer to see prices in their local currency.
Shopify Payouts: When & How Does Shopify Pay You?
By default, you’ll get paid on any business day after your funds have cleared bank transfer. These are the timelines by territory:
- U.S.: 2 business days
- Europe: 3 business days
- Hong Kong and Singapore: 4 business days
Setting Up & Using Shopify Balance
Shopify Balance makes it easy to manage your revenue within the Shopify ecosystem. It can also grant you faster access to your money than you’d get with a standard bank transfer — typically within one business day.
You can set up your Shopify Balance account through Finances > Balance. Select Open Account, enter the requested information, and go through the necessary agreements to set up your account.
Linking Shopify & Your Bank Account
To add or edit your bank account for billing purposes, go to Finances > Billing. Under Payment Methods, select Add Payment Method. Select Bank Account and enter your information. Finally, select Start Verification. Once verified, Shopify will debit your bank account for Shopify fees.
How To Transfer Money From Shopify To Your Bank Account
If you’re using Shopify Payments, you don’t need to do anything more. In fact, your money will never really be in Shopify. Shopify Payments –or whatever processor you use in place of it — routes your sales money to a merchant account where transaction fees will be deducted from your sale. Then, your money will be automatically routed to the bank account connected to your payment processor.
The exception to this is Shopify Balance, which replaces your bank account in the payment process. Once you’ve enabled Shopify Balance, your Shopify Payments deposits will be routed there instead of to your bank account. You can still switch back to your bank account. You can also transfer funds from your Shopify Balance account to a bank account by going to Finances > Balance > Move Money. Find Transfer Funds From Balance, and enter the appropriate account details.
Shopify Prohibited Items: What You Can & Can’t Sell With Shopify Payments
Shopify Payments inherits Stripe’s restrictions on the types of businesses that can use it. Certain industries and products are considered “high-risk” due to being associated with a higher rate of chargebacks and fraud. Third-party processors like Stripe and Square aggregate businesses into a single merchant account, so they tend to be very strict about keeping high-risk businesses off their networks.
You’ll need to select an alternative payment processor if your business falls into one of these categories.
| Prohibited Category | Definition | Examples Of Prohibited Businesses/Activities |
|---|---|---|
| Financial and professional services | This covers businesses that deal directly with investments, credit, or legal services | Credit counseling, bail bonds, financial institutions, check cashing, digital wallets, virtual currency |
| IP Infringement, regulated or illegal products and services | This covers vice-related businesses, as well as those engaged in illegal commerce | Pornography, sexually-oriented services, gambling, counterfeit goods, cannabis, businesses/countries under sanction |
| Products and services prohibited by law or Shopify’s financial partners | This overlaps with some of the previous categories, along with some additional businesses considered high-risk by Shopify’s partners | Nutritional supplements, social media activity services, multi-level marketing |
| Unfair, predatory, or deceptive practices | This covers businesses with dubious ethics | Get-rich-quick schemes, mug shot publications, resale of government offerings |
Note that this list applies specifically to U.S.-based businesses. While the prohibited list is nearly identical between nations and territories, there are some differences in the terms of service.
Taking The Next Step With Shopify Payments
Shopify Payments provides a user-friendly, fully integrated way to take payments through Shopify. Even better, it offers the ability to add additional payment gateways like PayPal and Amazon Pay at no additional cost. Remember that you’re not obligated to use Shopify Payments as your primary processor, although using a different one comes with an additional transaction fee.
Chris Motola
Expert Contributor at Merchant Maverick
Chris has been writing about small business topics since 2003. He has been featured in Fox Business, ABC News, Yahoo Finance, GoBankingRates, Newsweek, BizJournals, and other publications. He has a Bachelor’s of Arts in English Writing Arts from SUNY Oswego, and a Masters of Science in Interactive Media from the University of Central Florida.
View Chris Motola's professional experience on LinkedIn.

Latest posts by Chris Motola (see all)
- Credit Card Company Market Share - March 19, 2024
- Largest Credit Card Networks - March 19, 2024
- The Biggest Credit Card Issuers - March 19, 2024
- Largest Payment Processors - January 17, 2024
- The Complete Guide To ACH Processing Fees - November 30, 2023